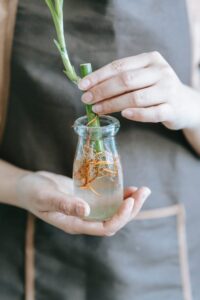
Looking to expand your Fairy garden without breaking the bank? Taking cuttings from your existing plants is the way to go! With a little time and effort, you can easily propagate many new plants for free.Willows are easy to take cutting from and also help you to root other specimens!The best time to take hardwood cuttings is from fall to early spring when the leaves are off. You can start with these easy trees:Willow CottonwoodPoplar or try your hand at propagating lilacs, roses, and hydrangeas. Vines like honeysuckle, grape, and ivy are also great options. And Ivy is a VERY easy vine to propagate!There are many common plants you can try propagating through cuttings. Here are a few more to get your ideas flowing: abelia, blueberry, boxwood, crape myrtle, fig, forsythia, grape, honey locust, hydrangea, juniper, rose, rose of Sharon, spirea, tea olive, viburnum, and weigela. And don’t forget, all types of grapes, including currants and gooseberries, can be used for cuttings!if the tree has started to make leaves DO NOT use it for cuttingsTake long cuttings about the size of a pencil in diameterSimply take hardwood cuttings in the fall to early spring when the leaves are off. Use sharp, clean pruners to take six to 8 inch-long, 3mm-diameter cuttings from vigorous shoots on the plants you want to propagate. If it is a tree or shrub that produces suckers from the stems or roots, use the suckers for your cuttings. They will usually root and grow easier than cuttings taken from other areas of the plant. Make sure to note which end is up when taking your cuttings, as upside-down cuttings won’t root.left is too small, right is too big, the held cutting is just rightYou can mix a rooting compound in water to help your cuttings along, or make your own rooting compound by soaking willow branches in water. Willow contains natural rooting hormone, which can encourage cuttings to produce roots more quickly.To make your own rooting accelerator, take a handful of fresh willow branches and cut them into small pieces. Place the pieces into a jar of water and let them soak for several days, until the water turns a light brown color. This will release the natural rooting hormone from the willow branches.You should notice roots in a few weeksKeep in mind that willow water can be a helpful tool in propagating cuttings, it’s not a guaranteed solution. Some plants may still take longer to root, or may not root at all. But by using this natural rooting accelerator, you’re giving your cuttings the best chance to succeed and grow into healthy, thriving plants. As I mentioned in the podcast, taking cuttings is definitely a numbers game. Take MANY cuttings because you will lose a few during each step of the process. (Unless you’re doing ivy 😄)Keep an eye on your cuttings for the appearance of roots, and when they appear, you can let them grow a bit before placing them into soil.
Many people do skip the step of soaking in water and plant their cuttings directly into their soil mix. I find, personally, that adding the rooting process in water works better for me. If you do decide to plant directly into soil without growing roots in water first, I suggest that you take your potted cuttings, wrap them in plastic, and keep them in the refrigerator for at least 10 days. This helps the cuttings to become established before producing roots. I have had good luck with this process with roses. You may want to try several different ways of getting your cuttings to root. It is such a fun process though and does not cost any money and gives You Beautiful new specimens so feel free to try many different ways!
Choosing the right type of soil for your newly rooted cuttings is very important. When it comes to soil, the key is to provide a well-draining mix that is also sterile to reduce the risk of disease and fungus.One option is to use a sterile soil mix specifically designed for rooting and transplanting plants. These mixes often contain a blend of peat moss, perlite, and vermiculite, which provide good drainage while also holding onto moisture to keep the roots hydrated.Another option is to use a sand mix, which is made up of a combination of sand, peat moss, and perlite. This type of mix gives better drainage for plants that are sensitive to excess moisture, such as succulents.
I have made my own mixes with sand, peat, compost and my own soil and sterilized it by baking it in the oven. Yes, yum yum- soil for dinner! But it worked! So if you’re doing this to cut costs, give it a try. 300 degrees for 30 minutes and allow it to cool in the oven. Put the soil onto baking trays no more than an inch thick. You may want to cover it with foil to reduce the smells.
No matter which type of soil mix you choose, it’s important to keep it moist but not too wet. Water the soil lightly as needed to keep it damp, but avoid overwatering, which can lead to root rot.
If you have not listened to the podcast(SDP#154) that goes with this article, please DO go listen! It will help you to have both resources in your gardening toolbox to get started with this project.With a little effort, time, love, and nurture you’ll have a garden full of beautiful, thriving plants in no time.


 With a little effort, time, love, and nurture you’ll have a garden full of beautiful, thriving plants in no time.


 With a little effort, time, love, and nurture you’ll have a garden full of beautiful, thriving plants in no time.